Published on 2019-02-14 by Anonymous
What is a personalization string? A personalization string lets you insert (subscriber) attributes, such as subscriber name, into your emails. Personalization strings can appear in the subject line, preheader, and/or in the content of the email. You may hear personalization strings referred to as merge fields or substitution strings.
Marketing Cloud offers out of the box personalization strings to use within Email Studio. The content is enclosed between double %% symbols. For our examples today, we will have only one % symbol so Marketing Cloud doesn’t accidentally convert them for us. Each of these can be very easily configured using a content block and personalization strings such as %field-name-of-the-field-of-interest-in-the-data-extension%. At the time of the email send, Marketing Cloud replaces these personalization strings with data for a given field from the target data extension.
Note: If a personalization string is inserted, and the attribute isn't populated, the string will appear blank in the email. It's important that you define a default value for every attribute you intend to use with a personalization string.
You can use personalization strings in three different ways:
- Data about the Email
- Example: %xtmonth% = Full name of the month in which email is sent
- Example: %linkname% = Descriptive name of hyperlink, aka link alias
- Data about the Recipient and Subscriber List
- Example: %emailaddr% = Subscriber’s Email Address
- Example: %mobile_number% = Mobile Number
- Data about the Sender
- Example: %replyname% = Your reply name, as defined in your account
Instructions on how to preview your personalization strings can be found in the How to preview personalized content in Marketing Cloud Content Builder blog post.
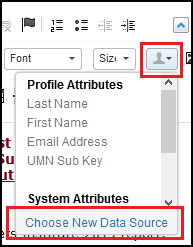
Note: Don’t use All Subscriber attributes %Last Name% and %First Name% because they are not reliable. %First Name% for a lot of people either appears blank or displays Friend.
Note: You can add your data extension fields to the WYSIWYG editor instead of manually typing them in by selecting Choose New Data Source and then navigating to your data extension.
View all Marketing Cloud Blog posts on our website.
Contact the SMC Admins for help at [email protected]
Send your blog ideas or submit a blog post to [email protected]